Getting Certified: Deploying PKI for my Home Lab

I figured the next step in consolidating identity for my home lab would be to deploy an SSO solution that would provide me a single place to manage all of my identities. AD does a pretty good job of this, but it doesn’t provide a place for me to manage my web users such as those for Wazuh and Splunk. That’s why I planned on deploying Authentik, a powerful, open source SSO solution.
Everything didn’t go according to the plan, however. Setting up Authentik wasn’t too terrible, but integrating services like Wazuh have not been so easy. As of writing this, Authentik is deployed and active but does not have any fully functional integrations.
My Problem
One of the problems I ran into was a mysterious 500 “Internal Server Error” HTTP status code when Wazuh tries to redirect to Authentik for authentication. One of the things I suspected was failed verification of the certificate my Authentik web server is using, which was self-signed like all of my certificates. It was only a matter of time before I would need or want to move away from self-signed certificates, so why not now? Maybe it would make my mysterious error go away, and even if it doesn’t my home lab is still better off with actual PKI.
First Attempts
At first I was still focused on fixing my SSO issues, so I wanted the bare minimum to get my Authentik server a trusted certificate. I spun up Active Directory Certificate Services on my domain controller, ldc01.jd.lab and manually walked through the certificate creation process.
We must create a certificate signing request (CSR) and then pass it over to our certificate authority (CA) (in this case it is ldc01.jd.lab) to be signed. Then we can copy over the signed certificate to lauth01.jd.lab, the server hosting Authentik, and have that be used instead of the default self-signed certificate.
Step one is to generate a new private key. The CSR we are going to create is essentially a bunch of information about the certificate we want to request and a public key that corresponds to the private key of the requester. All of this is signed using our private key to ensure that we actually own the private key corresponding to the public key and we “approve” of this request. The below commands do what we’re looking for (please note that I am missing a SAN field in this certificate request, so this certificate won’t pass verification for browsers. I will return to this in a little while).
1
2
3
4
5
6
# Generate a private key
openssl genrsa -out lauth01.key 2048

# Create a CSR
openssl req -new -key lauth01.key -out lauth01.csr \
  -subj "/CN=lauth01.jd.lab"
To get the CSR over to the CA for signing, I figured it would be best to use SCP. I didn’t have OpenSSH on my server yet, so I needed to set that up to use SCP. Luckily, doing so with PowerShell is quite simple.
1
2
3
Add-WindowsCapability -Online -Name OpenSSH.Server~~~~0.0.1.0
Start-Service sshd
Set-Service -Name sshd -StartupType Automatic
Once I copied my CSR over, I needed to sign it using certreq. When a certificate is signed, the CA enriches the CSR with other information according to a template and then signs a hash of the certificate data. Anyone who trusts the CA will also trust this certificate since the CA signed it.
1
certreq -submit -attrib "CertificateTemplate:WebServer"lauth01.csr lauth01.cer
After copying lauth01.cer to lauth01.jd.lab, I’d be good to go, or so I thought.
The Missing Piece
I selected lauth01.cer to be used as my web certificate in the Authentik GUI, restarted the surface, and I was still getting a security warning from my browser. I already added the root certificate to the trust store on my local machine at /etc/ca-certificates/trust-source/anchors and ran update-ca-trust, but there was still something wrong.
One of the first things I tried was to use curl instead of my browser. Interestingly enough, it worked fine and curl was able to verify my certificate without problem. With a little more research, it seems that most modern browsers actually do not check if the domain name matches the common name of the certificate, but one of the subject alternative names (SANs) instead. That field was missing from my certificate, so there was nothing to verify the domain name against and my client failed. curl uses both, so there were no issues there.
Having to reissue this certificate was an annoyance. I had to create a new CSR with an extra field, SCP the CSR over to ldc01.jd.lab, sign the CSR, SCP the certificate back over to lauth01.jd.lab, and then have Authentik use it. With one machine this wasn’t too much of an issue, but I could only imagine how tedious it would be to do this for every internal domain I decide to spin up. There had to be a better way.
Smallstep
Step one was to find a way to move away from AD CS while keeping it as my root of trust. Luckily, PKI is quite flexible in this regard. In fact, using a root CA to generate certificates is considered bad practice. Using the root CA to sign certificates means that the root’s private key is online more often, increasing its exposure and risk of being stolen or misused. There is also no way to revoke the root certificate; if it is compromised, the whole PKI must be replaced.
This is why intermediate CAs are used to sign certificates instead. One has a lot more control over them and there is far less risk if one is compromised. So long as the root CA is trusted and signs the intermediate CA’s certification, the intermediate will also be trusted, meaning we can ditch dealing with AD CS directly and instead opt for something more modern and friendly.
Smallstep is a device identity solution that made issuing certificates much easier for me. step-ca is one of the tools they offer and is a fully featured online CA that can automate a fair portion of PKI management. After following the step-cli installation instructions and installing the step-ca package, I needed to copy over my root certificate from AD CS and create an intermediate certificate for step-ca to use.
Exporting my root certificate was as simple as certutil -ca.cert root.cer. As for creating an intermediate certificate, I had to create a CSR on lauth01.jd.lab, SCP it over to ldc01.jd.lab, but this time I had to use a different template than WebServer. I duplicated the Subordinate Certification Authority template into one called SubCA and used that instead. This designates the private key holder as an intermediate authority verified by the root and has delegated permission to issue certificates.
Once I had both certifications and replaced the existing ones in the ~/.step/certs directory, I was good to go at last. The below command was sufficient to generate a private key and certification for any domain of mine.
1
step ca certificate "lauth01.jd.lab" lauth01.crt lauth01.key
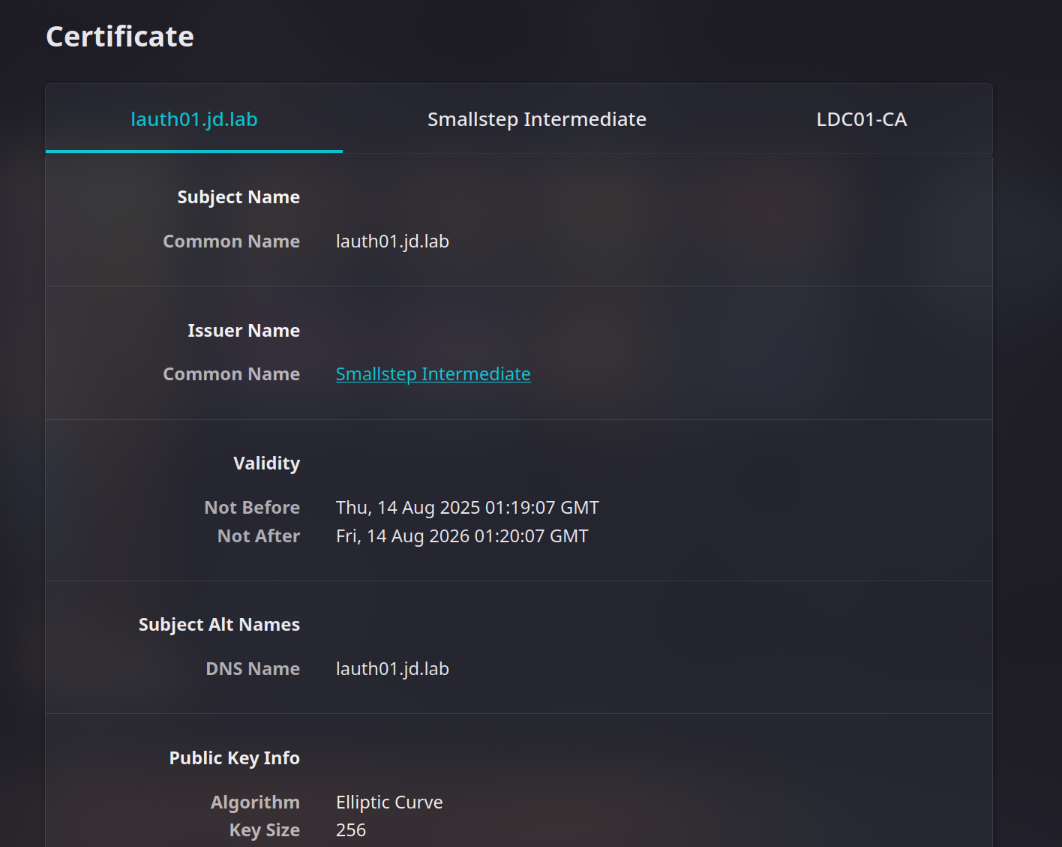
I took these, replaced the old root-signed certificate in Authentik with them, and my browser picked it up with no problem. Viewing the certificate in Firefox, we can see that all 3 certificates are being picked up perfectly.
Conclusion
That covers the initial deployment of my PKI. I’ve barely scratched the surface of such a complex topic, but it’s piqued my interest and I may do more with it in the future. Smallstep has many features that I have not explored as well, and that is certainly worth looking into. Now that I’ve got a trusted certificate on lauth01.jd.lab, I need to do the same for my other services such as Wazuh and Splunk. I’ll also have to write an Ansible playbook to add my root certificate to the trust stores of all my endpoints.
Home labbing has taught me that the work never ends, especially when you want to build something robust. I’m glad it’s presented me with so many opportunities to keep growing.